❝本文转自大数据老司机,原文:https://www.cnblogs.com/liugp/p/16859528.html,版权归原作者所有。欢迎投稿,投稿请添加微信好友:cloud-native-yang
概述
❝REmote DIctionary Server(
Redis) 是一个由 Salvatore Sanfilippo 写的 key-value 存储系统,是跨平台的非关系型数据库。
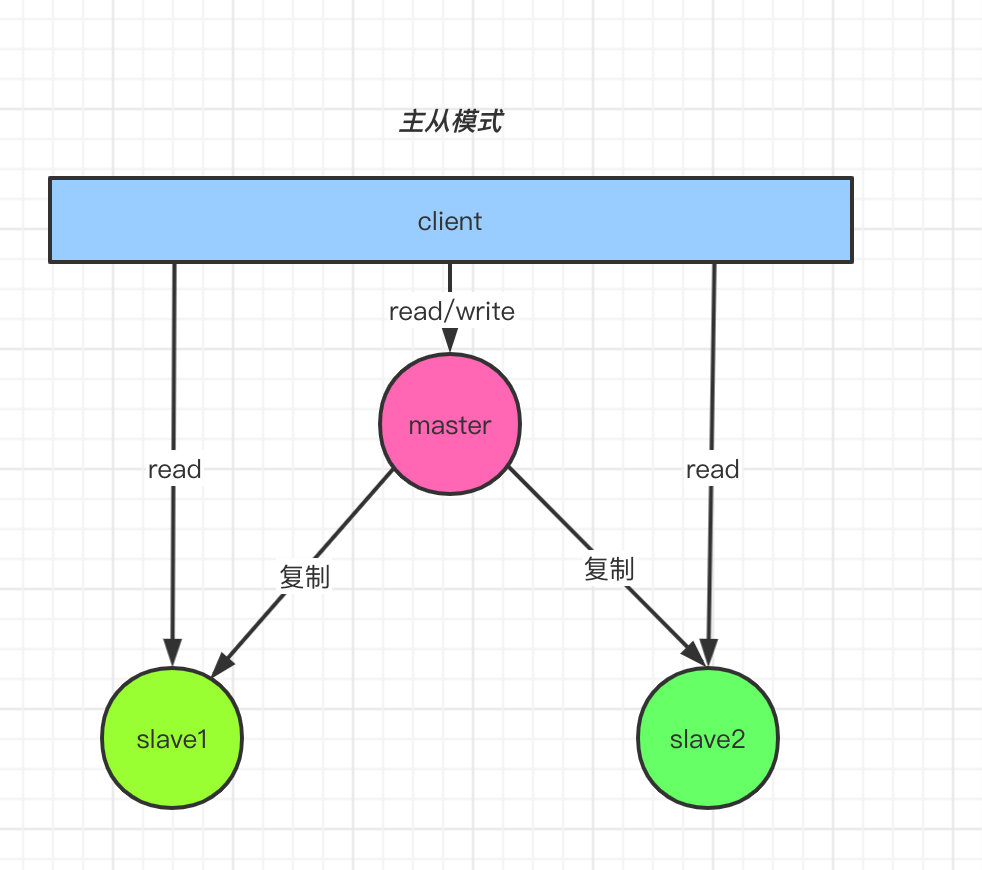
Redis有三种集群模式:主从模式,Sentinel(哨兵)模式,Cluster模式,这三种模式环境编排部署都会在本文章介绍与实战操作。
想了解更多关于redis概念与原理介绍,可参考我这篇文章:Redis原理介绍与环境部署(主从模式、哨兵模式、集群模式)[1]
redis 主从模式编排部署实战操作
地址:https://artifacthub.io/packages/helm/bitnami/redis
1)下载chart 包
$ helm repo add bitnami https://charts.bitnami.com/bitnami

$ helm pull bitnami/redis --version 17.3.7

$ tar -xf redis-17.3.7.tgz
2)构建镜像
这里就不重新构建镜像了,只是把远程镜像tag一下,推到本地harbor仓库加速下载镜像。有不清楚怎么构建镜像的小伙伴,可以私信或者留言。
$ docker pull docker.io/bitnami/redis:7.0.5-debian-11-r7

# tag
$ docker tag docker.io/bitnami/redis:7.0.5-debian-11-r7 myharbor.com/bigdata/redis:7.0.5-debian-11-r7

# 推送镜像到本地harbor仓库
$ docker push myharbor.com/bigdata/redis:7.0.5-debian-11-r7
3)修改yaml编排
redis/templates/master/pv.yaml
新增pv.yaml文件,内容如下:
{{- range .Values.master.persistence.local }}
---
apiVersion: v1
kind: PersistentVolume
metadata:
  name: {{ .name }}
  labels:
    name: {{ .name }}
spec:
  storageClassName: {{ $.Values.master.persistence.storageClass }}
  capacity:
    storage: {{ $.Values.master.persistence.size }}
  accessModes:
    - ReadWriteOnce
  local:
    path: {{ .path }}
  nodeAffinity:
    required:
      nodeSelectorTerms:
        - matchExpressions:
            - key: kubernetes.io/hostname
              operator: In
              values:
                - {{ .host }}
---
{{- end }}redis/templates/replicas/pv.yaml
新增pv.yaml文件,内容如下:
{{- range .Values.replica.persistence.local }}
---
apiVersion: v1
kind: PersistentVolume
metadata:
  name: {{ .name }}
  labels:
    name: {{ .name }}
spec:
  storageClassName: {{ $.Values.replica.persistence.storageClass }}
  capacity:
    storage: {{ $.Values.replica.persistence.size }}
  accessModes:
    - ReadWriteOnce
  local:
    path: {{ .path }}
  nodeAffinity:
    required:
      nodeSelectorTerms:
        - matchExpressions:
            - key: kubernetes.io/hostname
              operator: In
              values:
                - {{ .host }}
---
{{- end }}redis/values.yaml
global:
  redis:
    password: "123456"

...

image:
  registry: myharbor.com
  repository: bigdata/redis
  tag: 7.0.5-debian-11-r7

master:
  count: 1
  persistence:
    enabled: true
    size: 8Gi
    storageClass: "local-redis-storage"
    local:
    - name: redis-0
      host: "local-168-182-110"
      path: "/opt/bigdata/servers/redis/data/data1"

replica:
  replicaCount: 2
  persistence:
    enabled: true
    size: 8Gi
    storageClass: "local-redis-storage"
    local:
    - name: redis-1
      host: "local-168-182-111"
      path: "/opt/bigdata/servers/redis/data/data1"
    - name: redis-2
      host: "local-168-182-112"
      path: "/opt/bigdata/servers/redis/data/data1"
4)开始部署
# 创建存储目录
$ mkdir /opt/bigdata/servers/redis/data/data1

# 先检查语法
$ helm lint ./redis

# 开始安装
$ helm install redis ./redis -n redis --create-namespace
NOTES
REVISION: 1
TEST SUITE: None
NOTES:
CHART NAME: redis
CHART VERSION: 17.3.7
APP VERSION: 7.0.5

** Please be patient while the chart is being deployed **

Redis® can be accessed on the following DNS names from within your cluster:

    redis-master.redis.svc.cluster.local for read/write operations (port 6379)
    redis-replicas.redis.svc.cluster.local for read-only operations (port 6379)


To get your password run:

    export REDIS_PASSWORD=$(kubectl get secret --namespace redis redis -o jsonpath="{.data.redis-password}" | base64 -d)

To connect to your Redis® server:

1. Run a Redis® pod that you can use as a client:

   kubectl run --namespace redis redis-client --restart='Never'  --env REDIS_PASSWORD=$REDIS_PASSWORD  --image myharbor.com/bigdata/redis:7.0.5-debian-11-r7 --command -- sleep infinity

   Use the following command to attach to the pod:

   kubectl exec --tty -i redis-client \
   --namespace redis -- bash

2. Connect using the Redis® CLI:
   REDISCLI_AUTH="$REDIS_PASSWORD" redis-cli -h redis-master
   REDISCLI_AUTH="$REDIS_PASSWORD" redis-cli -h redis-replicas

To connect to your database from outside the cluster execute the following commands:

    kubectl port-forward --namespace redis svc/redis-master 6379:6379 &
    REDISCLI_AUTH="$REDIS_PASSWORD" redis-cli -h 127.0.0.1 -p 6379
5)测试验证
$ kubectl get pods,svc -n redis -owide
# 登录master,可读可写
$ kubectl exec -it redis-master-0 -n redis -- redis-cli -h redis-master -a $(kubectl get secret --namespace redis redis -o jsonpath="{.data.redis-password}" | base64 -d)

# 登录slave,只读
$ kubectl exec -it redis-master-0 -n redis -- redis-cli -h redis-replicas -a $(kubectl get secret --namespace redis redis -o jsonpath="{.data.redis-password}" | base64 -d)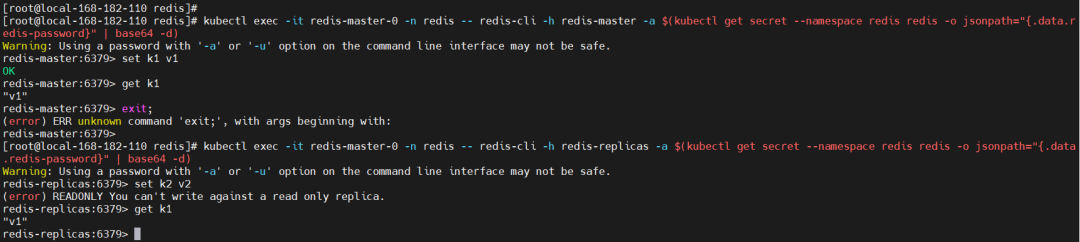
6)卸载
$ helm uninstall redis-sentinel -n redis-sentinel
# delete ns
$ kubectl delete ns redis-sentinel --force
# delete pv
$ kubectl delete pv `kubectl get pv|grep ^redis-|awk '{print $1}'` --force
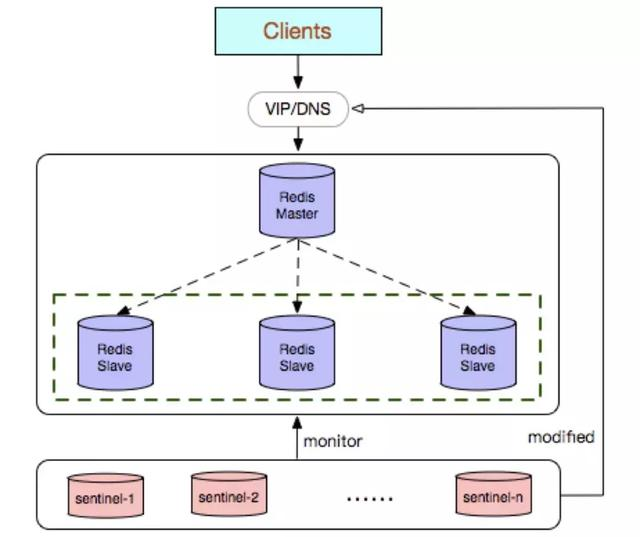
$ rm -fr /opt/bigdata/servers/redis/data/data1/*redis 哨兵模式编排部署实战操作
❝主从模式的弊端就是不具备高可用性,当master挂掉以后,Redis将不能再对外提供写入操作,因此sentinel应运而生。
1)构建镜像
这里也重新构建镜像了,有不懂构建镜像的小伙伴可以在评论下方留言。这里也只是把远程的镜像推送到本地harbor。
$ docker pull docker.io/bitnami/redis-sentinel:7.0.5-debian-11-r6
# tag
$ docker tag docker.io/bitnami/redis-sentinel:7.0.5-debian-11-r6 myharbor.com/bigdata/redis-sentinel:7.0.5-debian-11-r6
# push
$ docker push  myharbor.com/bigdata/redis-sentinel:7.0.5-debian-11-r6
2)修改yaml编排
redis-sentinel/values.yaml
replica:
  # replica.replicaCount与sentinel.quorum值一样
  replicaCount: 3
  storageClass: "local-redis-storage"
    local:
    - name: redis-0
      host: "local-168-182-110"
      path: "/opt/bigdata/servers/redis/data/data1"
    - name: redis-1
      host: "local-168-182-111"
      path: "/opt/bigdata/servers/redis/data/data1"
    - name: redis-2
      host: "local-168-182-112"
      path: "/opt/bigdata/servers/redis/data/data1"

sentinel:
  enabled: true
  image:
    registry: myharbor.com
    repository: bigdata/redis-sentinel
    tag: 7.0.5-debian-11-r6
quorum: 3redis-sentinel/templates/replicas/pv.yaml
新增pv.yaml文件,内容如下:
{{- range .Values.sentinel.persistence.local }}
---
apiVersion: v1
kind: PersistentVolume
metadata:
  name: {{ .name }}
  labels:
    name: {{ .name }}
spec:
  storageClassName: {{ $.Values.sentinel.persistence.storageClass }}
  capacity:
    storage: {{ $.Values.sentinel.persistence.size }}
  accessModes:
    - ReadWriteOnce
  local:
    path: {{ .path }}
  nodeAffinity:
    required:
      nodeSelectorTerms:
        - matchExpressions:
            - key: kubernetes.io/hostname
              operator: In
              values:
                - {{ .host }}
---
{{- end }}
3)开始部署
# 创建存储目录
$ mkdir -p /opt/bigdata/servers/redis/data/data1

$ helm install redis-sentinel ./redis-sentinel -n redis-sentinel --create-namespace
NOTES
NAME: redis-sentinel
LAST DEPLOYED: Fri Nov  4 22:42:52 2022
NAMESPACE: redis-sentinel
STATUS: deployed
REVISION: 1
TEST SUITE: None
NOTES:
CHART NAME: redis
CHART VERSION: 17.3.7
APP VERSION: 7.0.5

** Please be patient while the chart is being deployed **

Redis® can be accessed via port 6379 on the following DNS name from within your cluster:

    redis-sentinel.redis-sentinel.svc.cluster.local for read only operations

For read/write operations, first access the Redis® Sentinel cluster, which is available in port 26379 using the same domain name above.


To get your password run:

    export REDIS_PASSWORD=$(kubectl get secret --namespace redis-sentinel redis-sentinel -o jsonpath="{.data.redis-password}" | base64 -d)

To connect to your Redis® server:

1. Run a Redis® pod that you can use as a client:

   kubectl run --namespace redis-sentinel redis-client --restart='Never'  --env REDIS_PASSWORD=$REDIS_PASSWORD  --image myharbor.com/bigdata/redis:7.0.5-debian-11-r7 --command -- sleep infinity

   Use the following command to attach to the pod:

   kubectl exec --tty -i redis-client \
   --namespace redis-sentinel -- bash

2. Connect using the Redis® CLI:
   REDISCLI_AUTH="$REDIS_PASSWORD" redis-cli -h redis-sentinel -p 6379 # Read only operations
   REDISCLI_AUTH="$REDIS_PASSWORD" redis-cli -h redis-sentinel -p 26379 # Sentinel access

To connect to your database from outside the cluster execute the following commands:

    kubectl port-forward --namespace redis-sentinel svc/redis-sentinel 6379:6379 &
    REDISCLI_AUTH="$REDIS_PASSWORD" redis-cli -h 127.0.0.1 -p 6379
# 查看
$ kubectl get pods,svc -n redis-sentinel -owide
4)模拟故障测试
# 查看
$ kubectl exec -it redis-sentinel-node-0 -n redis-sentinel -- redis-cli -h redis-sentinel -a $(kubectl get secret --namespace redis-sentinel redis-sentinel -o jsonpath="{.data.redis-password}" | base64 -d) info replication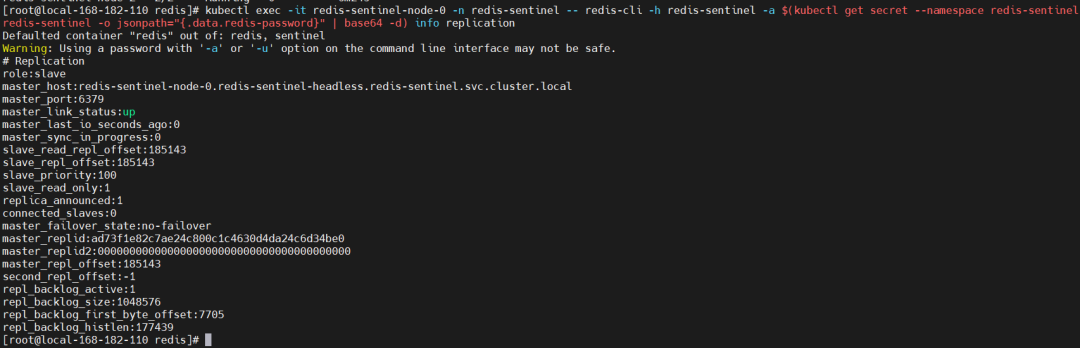
模拟故障,kill master pod
$ kubectl delete pod redis-sentinel-node-0 -n redis-sentinel再次查看master所在节点,master节点已经切换到其它节点了。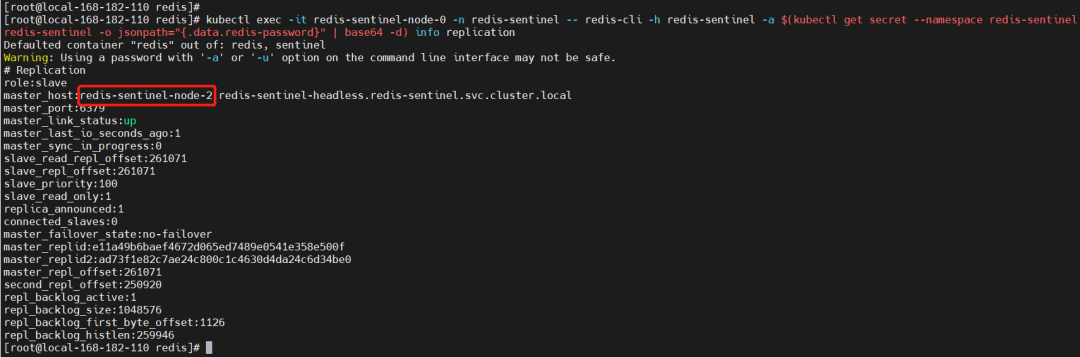
再测试读写
# 登录master节点
kubectl exec -it redis-sentinel-node-0 -n redis-sentinel -- redis-cli -h redis-sentinel-node-2.redis-sentinel-headless -a $(kubectl get secret --namespace redis-sentinel redis-sentinel -o jsonpath="{.data.redis-password}" | base64 -d)

# 登录slave节点
kubectl exec -it redis-sentinel-node-0 -n redis-sentinel -- redis-cli -h redis-sentinel-node-0.redis-sentinel-headless -a $(kubectl get secret --namespace redis-sentinel redis-sentinel -o jsonpath="{.data.redis-password}" | base64 -d)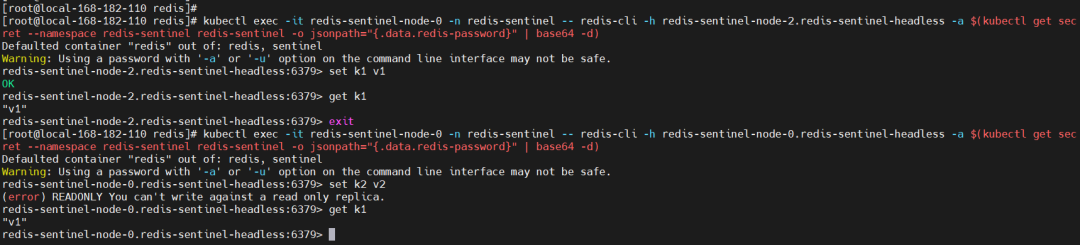
5)卸载
$ helm uninstall redis-sentinel -n redis
# delete ns
$ kubectl delete ns redis --force
# delete pv
$ kubectl delete pv `kubectl get pv|grep ^redis-|awk '{print $1}'` --force
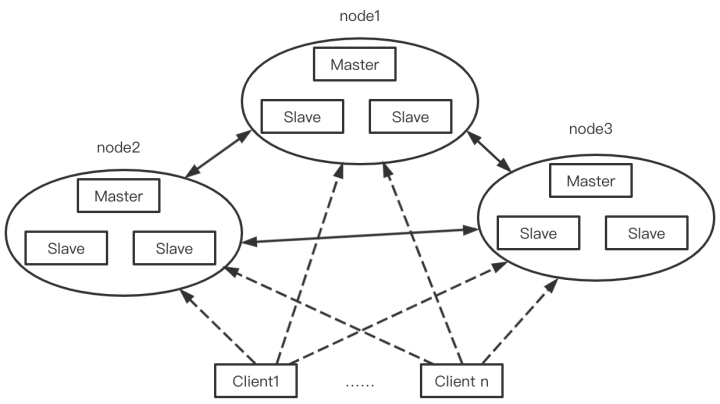
$ rm -fr /opt/bigdata/servers/redis/data/data1/*redis 集群模式编排部署实战操作
❝集群模式可以说是sentinel+主从模式的结合体,通过cluster可以实现主从和master重选功能,所以如果配置两个副本三个分片的话,就需要六个Redis实例。因为Redis的数据是根据一定规则分配到cluster的不同机器的,当数据量过大时,可以新增机器进行扩容。
1)下载chart 包
$ helm repo add bitnami https://charts.bitnami.com/bitnami

$ helm pull bitnami/redis-cluster --version 8.2.7

$ tar -xf redis-cluster-8.2.7.tgz
2)构建镜像
这里就不重新构建镜像了,只是把远程镜像tag一下,推到本地harbor仓库加速下载镜像。有不清楚怎么构建镜像的小伙伴,可以私信或者留言。
$ docker pull docker.io/bitnami/redis-cluster:7.0.5-debian-11-r9

# tag
$ docker tag docker.io/bitnami/redis-cluster:7.0.5-debian-11-r9 myharbor.com/bigdata/redis-cluster:7.0.5-debian-11-r9

# 推送镜像到本地harbor仓库
$ docker push myharbor.com/bigdata/redis-cluster:7.0.5-debian-11-r9
3)修改yaml编排
redis-cluster/templates/pv.yaml
新增pv.yaml文件,内容如下:
{{- range .Values.persistence.local }}
---
apiVersion: v1
kind: PersistentVolume
metadata:
  name: {{ .name }}
  labels:
    name: {{ .name }}
spec:
  storageClassName: {{ $.Values.persistence.storageClass }}
  capacity:
    storage: {{ $.Values.persistence.size }}
  accessModes:
    - ReadWriteOnce
  local:
    path: {{ .path }}
  nodeAffinity:
    required:
      nodeSelectorTerms:
        - matchExpressions:
            - key: kubernetes.io/hostname
              operator: In
              values:
                - {{ .host }}
---
{{- end }}
password: "123456"

...

image:
  registry: myharbor.com
  repository: bigdata/redis-cluster
  tag: 7.0.5-debian-11-r9

...

persistence:
  storageClass: "local-redis-cluster-storage"
  local:
    - name: redis-cluster-0
      host: "local-168-182-110"
      path: "/opt/bigdata/servers/redis-cluster/data/data1"
    - name: redis-cluster-1
      host: "local-168-182-110"
      path: "/opt/bigdata/servers/redis-cluster/data/data2"
    - name: redis-cluster-2
      host: "local-168-182-110"
      path: "/opt/bigdata/servers/redis-cluster/data/data3"
    - name: redis-cluster-3
      host: "local-168-182-111"
      path: "/opt/bigdata/servers/redis-cluster/data/data1"
    - name: redis-cluster-4
      host: "local-168-182-111"
      path: "/opt/bigdata/servers/redis-cluster/data/data2"
    - name: redis-cluster-5
      host: "local-168-182-111"
      path: "/opt/bigdata/servers/redis-cluster/data/data3"
    - name: redis-cluster-6
      host: "local-168-182-112"
      path: "/opt/bigdata/servers/redis-cluster/data/data1"
    - name: redis-cluster-7
      host: "local-168-182-112"
      path: "/opt/bigdata/servers/redis-cluster/data/data2"
    - name: redis-cluster-8
      host: "local-168-182-112"
      path: "/opt/bigdata/servers/redis-cluster/data/data3"

cluster:
  init: true
  # 一主两从(三组)
  nodes: 9
  replicas: 2
4)开始部署
# 创建存储目录
$ mkdir -p /opt/bigdata/servers/redis-cluster/data/data{1..3}

$ helm install redis-cluster ./redis-cluster -n redis-cluster --create-namespace
NOTES
NOTES:
CHART NAME: redis-cluster
CHART VERSION: 8.2.7
APP VERSION: 7.0.5** Please be patient while the chart is being deployed **


To get your password run:
    export REDIS_PASSWORD=$(kubectl get secret --namespace "redis-cluster" redis-cluster -o jsonpath="{.data.redis-password}" | base64 -d)

You have deployed a Redis® Cluster accessible only from within you Kubernetes Cluster.INFO: The Job to create the cluster will be created.To connect to your Redis® cluster:

1. Run a Redis® pod that you can use as a client:
kubectl run --namespace redis-cluster redis-cluster-client --rm --tty -i --restart='Never' \
 --env REDIS_PASSWORD=$REDIS_PASSWORD \
--image myharbor.com/bigdata/redis-cluster:7.0.5-debian-11-r9 -- bash

2. Connect using the Redis® CLI:

redis-cli -c -h redis-cluster -a $REDIS_PASSWORD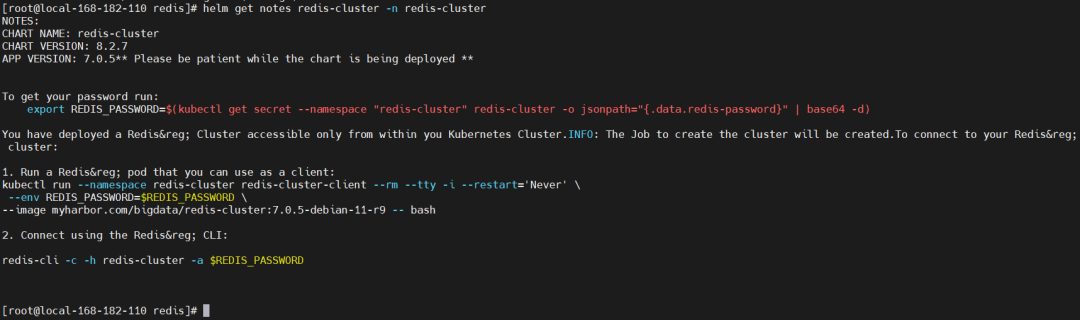
查看
$ kubectl get pods,svc -n redis-cluster -owide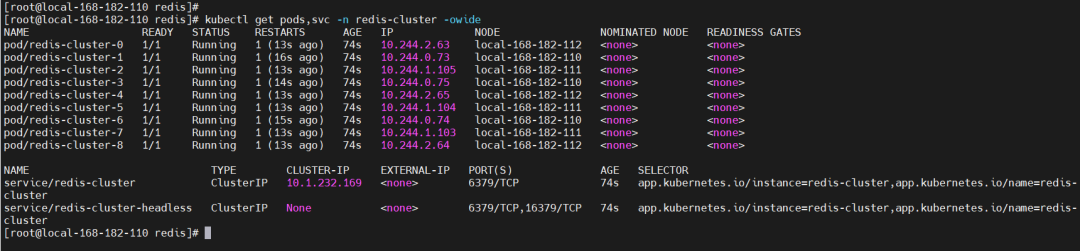
5)故障模拟测试
$ kubectl exec -it redis-cluster-0 -n redis-cluster -- redis-cli -c -h redis-cluster -a $(kubectl get secret --namespace "redis-cluster" redis-cluster -o jsonpath="{.data.redis-password}" | base64 -d) CLUSTER INFO

$ kubectl exec -it redis-cluster-0 -n redis-cluster -- redis-cli -c -h redis-cluster -a $(kubectl get secret --namespace "redis-cluster" redis-cluster -o jsonpath="{.data.redis-password}" | base64 -d) CLUSTER NODES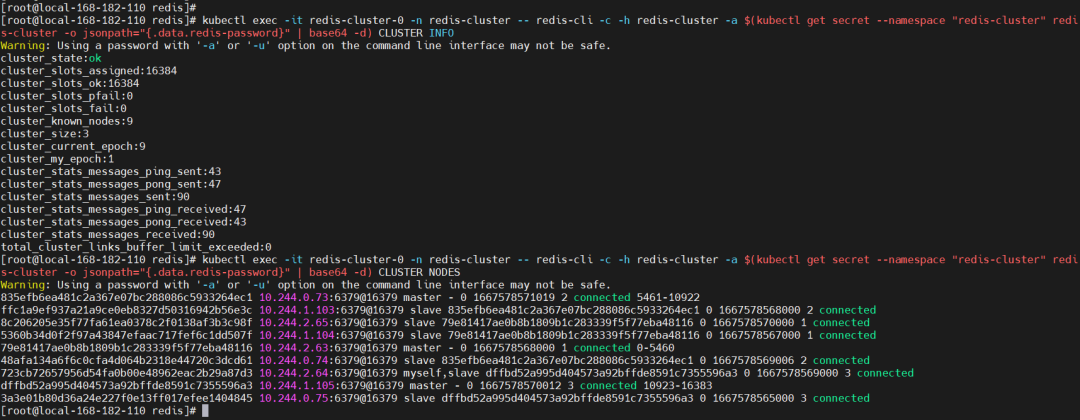
删除其中一个master节点
$ kubectl delete pod redis-cluster-1 -n redis-cluster

# 再查看节点情况
$ kubectl exec -it redis-cluster-0 -n redis-cluster -- redis-cli -c -h redis-cluster -a $(kubectl get secret --namespace "redis-cluster" redis-cluster -o jsonpath="{.data.redis-password}" | base64 -d) CLUSTER NODES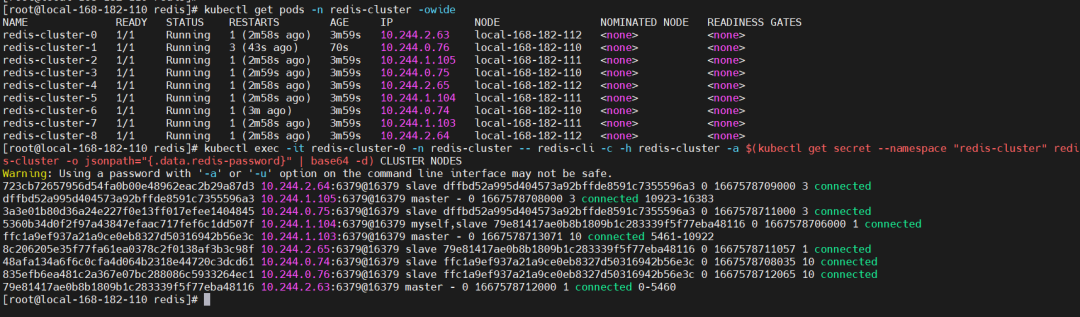
6)卸载
$ helm uninstall redis-cluster -n redis-cluster
# delete ns
$ kubectl delete ns redis-cluster --force
# delete pv
$ kubectl delete pv `kubectl get pv|grep ^redis-cluster-|awk '{print $1}'` --force

$ rm -fr /opt/bigdata/servers/redis-cluster/data/data{1..3}/*git地址:https://gitee.com/hadoop-bigdata/redis-on-k8s
Redis on K8s 三种模式的编排部署就先到这里了,小伙伴有任何疑问,欢迎给我留言哦,后续会持续更新【大数据+云原生】相关的问题~
引用链接
[1]
Redis原理介绍与环境部署(主从模式、哨兵模式、集群模式): https://www.cnblogs.com/liugp/p/16487671.html


你可能还喜欢
点击下方图片即可阅读
Cilium 未来数据平面:支撑 100Gbit/s k8s 集群
2022-11-14

Prometheus 官方记录片(中英双语),带你了解 Prometheus 的前世今生
2022-11-11

GraalVM 加持 Java 容器化,速度起飞!
2022-11-09

eBPF 技术实践:加速容器网络转发,耗时降低60%+!
2022-11-08


云原生是一种信仰 🤘
关注公众号
后台回复◉k8s◉获取史上最方便快捷的 Kubernetes 高可用部署工具,只需一条命令,连 ssh 都不需要!


点击 "阅读原文" 获取更好的阅读体验!
发现朋友圈变“安静”了吗?